Keeping your flute in optimal condition is crucial for preserving its tone, intonation, and overall performance. When replacement parts are needed, it’s essential to select components that offer the highest quality and compatibility with your instrument. This comprehensive guide will provide you with all the information you need to make informed decisions about flute replacement parts.

Essential Flute Replacement Parts
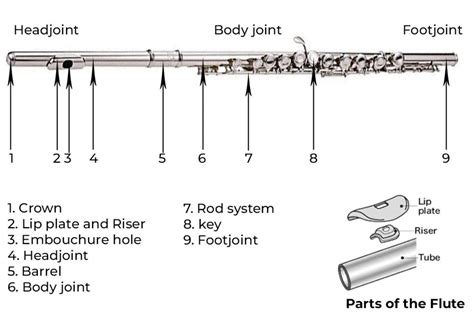
The flute consists of several essential parts that may require replacement over time. Here are some of the most common components:
- Headjoint: This is the upper section of the flute and contains the embouchure hole, lip plate, and blow hole.
- Body: The body forms the middle section and contains the tone holes and keys.
- Footjoint: The footjoint is the lower section and includes the lip plate and trill keys.
- Keys and Springs: Keys and springs enable the proper fingering and operation of the flute.
- Padding: Pads on the keys create an airtight seal when pressed, ensuring proper intonation and response.
Types of Flute Replacement Parts
Various types of flute replacement parts are available depending on the specific needs of your instrument. Here are some common options:
- OEM Parts: Original equipment manufacturer (OEM) parts are designed and manufactured by the same company that produced your flute. They offer the highest level of compatibility and durability.
- Aftermarket Parts: Aftermarket parts are made by third-party manufacturers and may be designed as direct replacements or upgrades for OEM parts.
- Vintage Parts: Vintage parts are original parts from older flutes and may be used to restore vintage instruments or achieve a specific tone.
Choosing the Right Flute Replacement Parts
Selecting the right flute replacement parts is important for both the performance and longevity of your instrument. Here are some key factors to consider:
- Compatibility: Ensure that the replacement part is designed to fit your specific flute model.
- Material: Choose parts made from high-quality materials such as sterling silver, gold, or platinum for durability and longevity.
- Precision: Opt for parts with precise manufacturing tolerances to maintain proper intonation and responsiveness.
- Cost: Replacement parts vary in price, so consider your budget and the performance level required.
Benefits of Using Quality Flute Replacement Parts
Investing in high-quality flute replacement parts offers several benefits:
- Enhanced Tone: Quality parts can improve the overall tone of the flute, providing a richer and more resonant sound.
- Improved Intonation: Precision-made parts ensure accurate intonation throughout the entire range of the flute.
- Increased Longevity: Durable materials and proper fit extend the lifespan of your flute, reducing the need for frequent repairs.
- Enhanced Performance: Replacements parts enable optimal fingering and response, allowing for more expressive and technical playing.
Future Trends in Flute Replacement Parts
The future of flute replacement parts is expected to see:
- Increased Use of Advanced Materials: Innovations in materials science will lead to the development of even stronger and more durable parts.
- Customizable Options: Flute manufacturers may offer customizable replacement parts to meet the specific preferences of players.
- Smart Technology Integration: Advanced sensors and technology may be incorporated into replacement parts to provide real-time feedback on performance or instrument health.
Tips for Replacing Flute Parts
- Consult a Repair Technician: For major repairs or complex parts, it’s recommended to consult a qualified repair technician.
- Follow Manufacturer’s Instructions: Carefully follow the manufacturer’s instructions for installation and maintenance of replacement parts.
- Use Proper Tools: Invest in high-quality tools specifically designed for flute repair.
- Test Before Performance: After replacing parts, thoroughly test the flute before performing to ensure optimal functionality.
Step-by-Step Guide to Replacing Flute Parts
Headjoint:
1. Remove the crown and cork from the headjoint.
2. Install the new headjoint and tighten the crown securely.
3. Adjust the cork position for optimal embouchure.
Body:
1. Unscrew the old body and detach it from the headjoint and footjoint.
2. Clean the tenon and socket with a soft cloth and alcohol.
3. Apply a thin layer of cork grease and insert the new body into the tenon.
4. Secure the body with screws.
Footjoint:
1. Unscrew the old footjoint and separate it from the body.
2. Insert the new footjoint into the tenon on the body.
3. Tighten the screws securely.
4. Adjust the lip plate and trill keys as needed.
Keys and Springs:
1. Remove the old key or spring with a pair of pliers.
2. Install the new key or spring and ensure it is properly aligned.
3. Adjust the key’s action and tension as necessary.
Padding:
1. Remove the old pad from the key with a pad saver.
2. Apply a small amount of adhesive to the new pad and attach it to the key.
3. Position the pad precisely over the tone hole and allow the adhesive to dry.
Troubleshooting Flute Replacement Parts
Common Problems:
– Leaks: Leaks can be caused by worn pads, misaligned keys, or a loose body.
– Squeaking: Squeaking can result from loose springs, poor pad sealing, or a dirty embouchure hole.
– Intonation Issues: Intonation problems may arise from misaligned keys, a damaged headjoint, or a poorly fitted footjoint.
Solutions:
– Check the pads for wear or damage and replace if necessary.
– Adjust the key alignment and tension to ensure proper sealing.
– Clean the embouchure hole and other components regularly.
– Consult a qualified flute repair technician for complex problems.
Future-Proofing Your Flute with Replacement Parts
Investing in high-quality flute replacement parts is an essential step towards ensuring the longevity and performance of your instrument. By carefully selecting and maintaining your flute’s components, you can enjoy a lifetime of musical expression and excellence. As the future of flute making evolves, embracing innovation and customization will enable players to achieve even greater heights of artistry with their instruments.
Tables
Table 1: Average Cost of Flute Replacement Parts
| Part | OEM | Aftermarket |
|---|---|---|
| Headjoint | $250-$450 | $150-$300 |
| Body | $400-$700 | $250-$500 |
| Footjoint | $200-$350 | $120-$250 |
| Keys | $50-$150 | $30-$100 |
| Springs | $10-$30 | $5-$20 |
Table 2: Materials Used in Flute Replacement Parts
| Material | Benefits | Drawbacks |
|---|---|---|
| Sterling Silver | Durability, Rich Tone | Costly |
| Gold | Warm Tone, Corrosion Resistance | Soft, Prone to Denting |
| Platinum | Highly Durable, Bright Tone | Extremely Expensive |
| Stainless Steel | Corrosion Resistant, Affordable | Less Resonant |
Table 3: Compatibility of Flute Replacement Parts
| Flute Brand | Compatible Parts |
|---|---|
| Yamaha | OEM, Aftermarket |
| Pearl | OEM, Aftermarket |
| Muramatsu | OEM |
| Gemeinhardt | OEM, Aftermarket |
| Haynes | OEM |
Table 4: Maintenance Schedule for Flute Replacement Parts
| Part | Recommended Maintenance Interval |
|---|---|
| Pads | Replace every 1-2 years |
| Springs | Inspect and replace as needed |
| Keys | Adjust and tighten as necessary |
| Body and Headjoint | Clean and inspect regularly |